Spinach is one of the first things we harvest in the spring-time here. It is very tolerant of cold weather, and when planted under cloches or in a cold-frame, you can get a very early harvest! It is so refreshing to have fresh greens after a long winter.
One of our favorite things to do with spinach in this house is to incorporate it into a variety of Greek and Mediterranean dishes. Our favorite, hands down, is spanikopita. The traditional version calls for many, many sheets of phyllo pastry and a lot of butter that's brushed between the pastry sheets. While it tastes fabulous (sometimes I swear I hear an angelic chorus when I take my first bite), it is loaded with a lot of fat. And the fat cells in my butt are the friendly sort, always welcoming to newcomers.
Soooo, after some experimentation, I have come up with a lower-fat version using pie crusts. Notice I did not say "fat-free", pie crust has enough lipid storage-inducing action of its own. But the fat content of the pie crust is still much, much lower than the traditional phyllo and butter combination. Without further ado, my perversion of Greek spinach pie:
Non-traditional Greek-style Spinach Pie
2 pounds fresh spinach -- washed, stemmed, and chopped
olive oil
1 medium onion -- finely chopped
1 bunch of green onions, or about 4 to 5 scallions -- finely chopped
1/4 cup fresh snipped dill
1/4 cup fresh chopped parsley
4 large eggs
8 oz feta cheese, crumbled
1/4 to 1/2 cup grated parmesan cheese (if you have kefalotiri cheese, use that)
1/4 tsp salt, to taste (optional, depends on how salty your feta is)
freshly ground black pepper -- just a few grinds
pinch of freshly ground nutmeg -- a little goes a long way
crusts for a covered 9-inch pie (two pieces of pastry, one on top and one on bottom)
Preheat oven to 375 deg F.
Heat a couple of tablespoons of olive oil in a large skillet, over medium heat. Add onion and green onion/scallions, cook until softened (about 6 minutes).
Add chopped spinach a little at a time, cooking until wilted and liquid is released. Once all the spinach has been added to the pan (and this takes a few minutes), turn up the heat to "high" and cook until the liquid is gone and the spinach is fairly dry. Stir often to prevent burning!! The liquid evaporation will take about 10 minutes or so.
Add the dill and parsley, mix well. Remove from heat and let cool slightly. Place spinach into colander and press to remove any excess liquid that might be in there.
In a large bowl, lightly beat the eggs. Add the cooled spinach mixture, the feta, parmesan cheese, salt, a few grinds of black pepper, and the pinch of nutmeg. Mix well, ensuring the egg is completely incorporated (otherwise you'll get weird veins of scrambled egg in the middle of your spinach pie...just speaking from experience here).
Lightly grease a glass/ceramic pie dish with cooking oil. Place one crust on the bottom of the dish, making sure it fits on the bottom and up the sides, and filling in any holes or gaps. Put spinach/egg/cheese mixture into crust, spreading to evenly fill. I tend to make mine a little higher in the center and lower around the sides, but that's just my preference. Top with the other pie crust, sealing around the edges. Cut a few vent slits on the top of the pie with a sharp knife.
Bake for 45 minutes or so, or until your crust is golden brown. Let stand 10 minutes before cutting and serving.
************************************
NOTES: If you don't grow your own spinach, you can buy 2 of the 16-oz bags of fresh spinach at the market, or 3 of the 10-oz bags will get you close enough. I've also used 3 10-oz boxes of the frozen chopped spinach and it turns out just fine. DO NOT USE CANNED SPINACH, I can tell you from experience that it just does not work out well.
Also, you really do want to drain the cooked spinach mixture in a colander. This is important, because if there is extra liquid it makes the finished dish soggy and limp, and the crust is slimy. This goes for making it the traditional way with the phyllo, too. Removing all that liquid makes the dish have more body and a pleasing texture. You don't have to let it cool before doing this step, I just don't like to burn my hands. Allowing it to cool slightly also prevents the hot spinach from immediately cooking the eggs in the next step.
I have found that it is generally cheaper to buy a solid 8-oz block of feta and crumble it myself, than to purchase it already crumbled.
You can use dried herbs in place of the fresh ones, just use way less since dried herbs are so much stronger in flavor.
You can make your own pie crusts, or buy a box of 2 at the market.
My kids scarf this recipe, even my anti-vegetable son. He loves it!
Enjoy!
Showing posts with label recipe. Show all posts
Showing posts with label recipe. Show all posts
Saturday, April 3, 2010

Thursday, March 11, 2010
Fancy Feast -- Pumpkin Muffins
My daughter requested a tea party breakfast a couple of nights ago, to which I absently replied, "Sure! No problem!" before I really thought about it.
I completely forgot about her request until I'd put her brother on the bus yesterday morning. I was cruising around the kitchen trying to figure out if I wanted to make something or just do cereal for breakfast when her request ricocheted from somewhere in the depths of my brain.
Luckily, at this age she's also pretty easy to please. I found a can of pumpkin hiding in the pantry (you have to watch those rogue cans, you know) and decided I would make these delectable "nuffins". They are great for sneaking in some beta carotene and fiber in your kids' (or your) diet.
Pumpkin Muffins
--------------------------------------
2 1/2 cups flour
2 cups sugar
2 tsp baking soda
1 tsp salt
1 T cinnamon
1/4 tsp allspice
1/4 tsp ground cloves
3 eggs
1 3/4 cup plain unspiced pumpkin (1 regular-sized can)
3/4 cups veg oil
1/2 cup raisins
Preheat oven to 375 degrees. Lightly grease 18 muffin cups.
In a large bowl, mix dry ingredients well. In a separate bowl, beat eggs, add pumpkin and oil, stirring to combine. Add wet ingredients to dry ingredients until everything is just moistened and incorporated. Do not over mix!! Add raisins, stirring just to combine.
Fill 18 muffin cups 3/4 full (you can also do 12 muffins and 2 mini loaf pans with this recipe). Sprinkle tops with cinnamon and sugar. I keep some on hand in a shaker and use it on toast, but in case you don't, here's a nice ratio:
2 T sugar
1/4 tsp cinnamon
Bake at 375 degrees for 30 minutes or until done.
Here's something that I do that helps when filling muffin cups: I use the small gravy ladle that comes with your "serving" set from your flatware. Note that this is NOT a standard ladle, generally used for soups or drinks. Using the (small) gravy ladle means less drips and mess than using a straight spoon, and one ladle-full is generally just right per muffin cup.
*******************************************************

Be sure to note the obnoxious rings around my burners. I have not found a cleaner yet that will take them completely off, and I can't use abrasives on my ceramic cooktop. So here they are, for your viewing pleasure. Hey, just keepin' it real.
Miss K loved her fancy "tea" party for breakfast. She opted for the royal hot chocolate with marshmallows instead of tea but that's OK. Aren't princesses allowed some concessions every now and then? We noshed with a tiara (of course), blanket spread on the floor like a "picnic", and an artful display of toy food from K's play kitchen, lovingly arranged by K herself.
I did question the plastic food replicas, but was informed in no uncertain terms that they needed to be there. Apparently I'm too gauche to know that play food is a required presence for all fancy tea party breakfasts. I really need to learn current hostessing etiquette...

I completely forgot about her request until I'd put her brother on the bus yesterday morning. I was cruising around the kitchen trying to figure out if I wanted to make something or just do cereal for breakfast when her request ricocheted from somewhere in the depths of my brain.
Luckily, at this age she's also pretty easy to please. I found a can of pumpkin hiding in the pantry (you have to watch those rogue cans, you know) and decided I would make these delectable "nuffins". They are great for sneaking in some beta carotene and fiber in your kids' (or your) diet.
Pumpkin Muffins
--------------------------------------
2 1/2 cups flour
2 cups sugar
2 tsp baking soda
1 tsp salt
1 T cinnamon
1/4 tsp allspice
1/4 tsp ground cloves
3 eggs
1 3/4 cup plain unspiced pumpkin (1 regular-sized can)
3/4 cups veg oil
1/2 cup raisins
Preheat oven to 375 degrees. Lightly grease 18 muffin cups.
In a large bowl, mix dry ingredients well. In a separate bowl, beat eggs, add pumpkin and oil, stirring to combine. Add wet ingredients to dry ingredients until everything is just moistened and incorporated. Do not over mix!! Add raisins, stirring just to combine.
Fill 18 muffin cups 3/4 full (you can also do 12 muffins and 2 mini loaf pans with this recipe). Sprinkle tops with cinnamon and sugar. I keep some on hand in a shaker and use it on toast, but in case you don't, here's a nice ratio:
2 T sugar
1/4 tsp cinnamon
Bake at 375 degrees for 30 minutes or until done.
Here's something that I do that helps when filling muffin cups: I use the small gravy ladle that comes with your "serving" set from your flatware. Note that this is NOT a standard ladle, generally used for soups or drinks. Using the (small) gravy ladle means less drips and mess than using a straight spoon, and one ladle-full is generally just right per muffin cup.
*******************************************************

Be sure to note the obnoxious rings around my burners. I have not found a cleaner yet that will take them completely off, and I can't use abrasives on my ceramic cooktop. So here they are, for your viewing pleasure. Hey, just keepin' it real.
Miss K loved her fancy "tea" party for breakfast. She opted for the royal hot chocolate with marshmallows instead of tea but that's OK. Aren't princesses allowed some concessions every now and then? We noshed with a tiara (of course), blanket spread on the floor like a "picnic", and an artful display of toy food from K's play kitchen, lovingly arranged by K herself.
I did question the plastic food replicas, but was informed in no uncertain terms that they needed to be there. Apparently I'm too gauche to know that play food is a required presence for all fancy tea party breakfasts. I really need to learn current hostessing etiquette...

Wednesday, February 24, 2010
Cooking Venture -- Blueberry Scones
So, an idea I've been batting around for a while is incorporating some recipes into the ol' blog. I make up quite a lot of my own recipes, and tweak out other ones that I come across. I ain't no Pioneer Woman, but I do like to cook. And eat. And eat what I cook.
I have no idea what to call this project, or whether or not I want to devote a second blog or page to it. We'll just see how it goes!
This is what I made for breakfast this morning. My husband said that this is the right combination, and to keep this one, and that these are "the best ones [I've] ever made" -- so I figured I'd share it:
Blueberry Scones
2 1/4 cups flour
1/3 cup sugar
1 Tablespoon baking powder
1/2 teaspoon salt
5 Tablespoons cold stick butter or margarine
1 tsp lemon zest
1/4 tsp nutmeg
1 cup blueberries
1/2 cup white chocolate chips
1 egg
3/4 cup buttermilk plus a little extra
1/4 tsp lemon extract
1 tsp almond extract
Preheat oven to 425 deg F.
Mix together flour, sugar, baking powder, and salt in a large bowl. Cut the butter into the flour mixture using a pastry cutter (2 knives works OK too). Mix in lemon zest and nutmeg.
Add blueberries, stir to coat with flour mixture, then add white chocolate chips. Add egg, 3/4 cup buttermilk, lemon extract, and almond extract. Mix well, making sure all the dry ingredients are incorporated. Mixture will be sticky and very moist.
Drop dough by spoonfuls onto ungreased baking sheet -- I got twelve scones on a half-sheet. Brush tops with a little buttermilk, taking care not to get milk all over your pan. (Trust me, it's a pain in the butt to get off once it's baked on there, and makes the scones stick like crazy). Sprinkle with sugar.
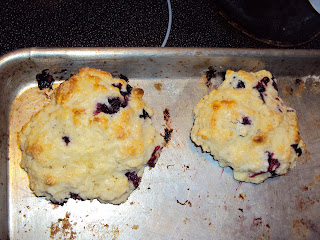
Bake at 425 for 15 to 17 minutes, more or less depending on your oven. My oven cooks a little slow, so you may want to back it off below 15 minutes. The end product should have browned peaks on top and be tender and fluffy in the middle. The other scones I make are a little more cakey, but these are a little lighter in texture.
Here's a picture of what's left; my husband took some to a staff meeting, and the kids helped me with the rest. Please excuse the photo quality!
I have no idea what to call this project, or whether or not I want to devote a second blog or page to it. We'll just see how it goes!
This is what I made for breakfast this morning. My husband said that this is the right combination, and to keep this one, and that these are "the best ones [I've] ever made" -- so I figured I'd share it:
Blueberry Scones
2 1/4 cups flour
1/3 cup sugar
1 Tablespoon baking powder
1/2 teaspoon salt
5 Tablespoons cold stick butter or margarine
1 tsp lemon zest
1/4 tsp nutmeg
1 cup blueberries
1/2 cup white chocolate chips
1 egg
3/4 cup buttermilk plus a little extra
1/4 tsp lemon extract
1 tsp almond extract
Preheat oven to 425 deg F.
Mix together flour, sugar, baking powder, and salt in a large bowl. Cut the butter into the flour mixture using a pastry cutter (2 knives works OK too). Mix in lemon zest and nutmeg.
Add blueberries, stir to coat with flour mixture, then add white chocolate chips. Add egg, 3/4 cup buttermilk, lemon extract, and almond extract. Mix well, making sure all the dry ingredients are incorporated. Mixture will be sticky and very moist.
Drop dough by spoonfuls onto ungreased baking sheet -- I got twelve scones on a half-sheet. Brush tops with a little buttermilk, taking care not to get milk all over your pan. (Trust me, it's a pain in the butt to get off once it's baked on there, and makes the scones stick like crazy). Sprinkle with sugar.
Bake at 425 for 15 to 17 minutes, more or less depending on your oven. My oven cooks a little slow, so you may want to back it off below 15 minutes. The end product should have browned peaks on top and be tender and fluffy in the middle. The other scones I make are a little more cakey, but these are a little lighter in texture.
Here's a picture of what's left; my husband took some to a staff meeting, and the kids helped me with the rest. Please excuse the photo quality!

Subscribe to:
Posts (Atom)


